5 Tips to Jumpstart your Meal Planning Goals

mealplan2

Well here we are, already sitting pretty in the middle of January. I hope that your resolutions/goals/intentions/whatever you have chosen to improve or maintain in your life are well underway and you are feeling some sort of positive energy in your life with this new year.

We celebrated hard over the holidays and enjoyed indulging in pretty much every single one of our food and beverage vices. We were down in New Orleans for the majority of the holiday break and I’m pretty sure that we left that city being on a first name basis with the local Cafe du Monde. We also ventured out for my birthday over the holidays and ate our fill at The Palace Cafe and sipped on sazeracs at the Carousel Bar. Needless to say, we needed a bit of a fresh, clean start upon our arrival back in Dallas post-holiday gluttony.

We typically eat pretty healthy in our house and are all about integrating healthy foods into every meal but also being mindful of occasional treats in our diet. We definitely love our sweets and cocktails and think that finding ways to moderate these goodies makes for a more balanced food-life.

One way that I have been able to find that happy medium in our family is by sitting down weekly and thinking through our meal plan and grocery list. I realize this isn’t a novel idea, but it took me a few years into our marriage to figure out how to meal plan for our family unit. I love reading blog posts about habits and how other people find their groove in various daily routines and seemingly mundane tasks. So I thought I would share one of ours with y’all in the hopes that it might inspire you to take control of how you and your family look at food in this new year!

mealplan3

  1. Make a date with your meal plan: this has been the biggest influence in getting a weekly meal plan together for our family. I remember when my husband and I first got married and I would go to the grocery store and essentially pick up whatever looked good at the time with no real game plan in mind. We were both busy starting our careers and weren’t really dedicating any time to meal planning in our life. What ended up happening was a lot of frustrating dinners, confusion on who was cooking on what night, overspending on groceries and food waste. It wasn’t until I had my first daughter and decided to primarily stay home that I began to schedule grocery trips and make meal plans. I would typically sit down with my weekly calendar during her morning nap on Monday and then do a big grocery haul early in the week. I was still working through overspending and food waste but having a game plan for what meals were shopped for helped TREMENDOUSLY. Now I typically make a date on Sunday mornings with my planner, a few cookbooks, and some of the weekly grocery store adds to formulate my plan. If I’m really on top of things I will run to the store (sans children!) during the girls nap time in the afternoon and that way we can start the week off on the right foot. Designating that chunk of time on Sunday mornings JUST for food planning and recipe searching has become a such a happy little ritual in my week that I so look forward to and I really challenge you to find a time in your week to sit down and do the same.
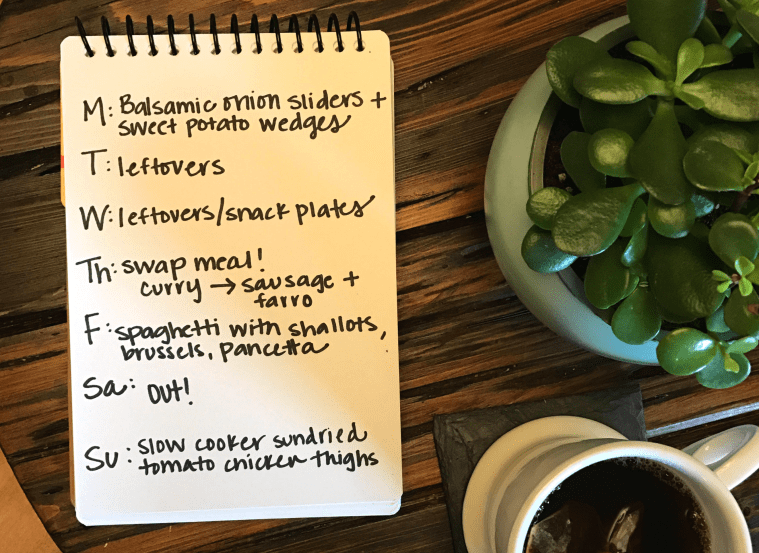
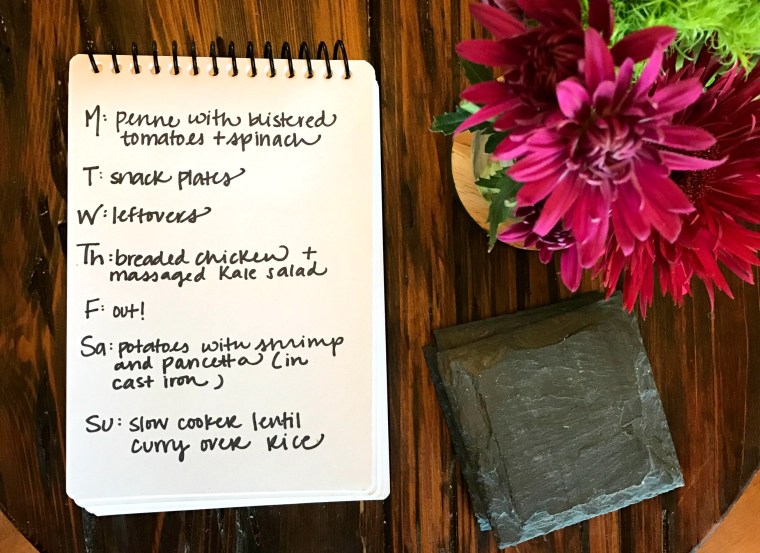
  2. Slow Cooker Sundays: This was something that I started last year in effort to make our Sunday evenings a little less crazy. My husband and I are both part of the worship band for the youth Mass at our church and that means that our family goes to mass rather late in the day and we are gone for the majority of the afternoon post nap time. I found that throwing something in the slow cooker and making a simple side earlier in the day on Sundays helped the crazy transition that was packing up instruments/loading everyone in the car/coming home/making dinner/feeding grumpy hangry people/bedtime/etc. Now we come home, dish out everyone’s dinner, sit, enjoy, put kids in bed. Simpler and way less hectic. Also, planning to use my slow cooker on Sundays helps in my meal planning dates that happen on Sundays because I know there will be minimal effort involved when it comes to dinner that day/evening.
  3. One new recipe a week: I would gladly try out and test a new recipe every. single. day. But unfortunately that makes for a whole lot of leftovers and not a whole lot of consistency in our meal plan (also again with the overspending and eventual food waste). I’ve limited myself to only trying out one new recipe a week. Now I realize that for some trying a new recipe every week may seem daunting if cooking is not your thing but it is a really great practice to add more variety to your family’s meals. If once a week sounds like too much try once a month! It is so worth it for your sanity and not getting into a food rut in the kitchen.
  4. Share it! Send it! Post it! Write it down!: Over the past year I’ve been sharing my meal plans on Instagram. I’ve found that sharing publicly our menu for the week has been a great motivator to eat healthy and try new things. I’ve also had a meal plan on our fridge or big chalkboard in the kitchen. Even if you aren’t sharing out through social media – sharing within your home, with your family can be a great accountability tool to get a meal plan done.
  5. Find your food bibles: I have 3-4 cookbooks and a handful of food blogs that I go back to for regularly rotated recipes. When I sit down for my weekly meal plan date I grab these books and flip through the pages, especially the beloved dog eared ones and if I am feeling uninspired odds are by looking through these books I will find something to spark my taste buds interest. I have also made a Pinterest board for recipes I’ve actually tried and LIKED. I have a gigantic board of random food recipes that I get inspiration from (called foodie) but when I try one of those recipes and like it, it gets moved to the “tried and liked” board to ensure that it doesn’t get lost in the shuffle.

mealplan1

I will also flip through the grocery circulars every week to see what is in season/on sale and if I have a coupon for a great deal I might meal plan around that – my two year old daughter also likes flipping through these ads with me and if there is something that she sees that is within reason to buy that week I’ll add it to the list. I would definitely like to streamline our process a bit more and really enjoyed reading Kelsey’s post on her grocery shopping spreadsheet that she has created to make meal planning and food prep a bit easier on her sanity. Maybe one day I can I hope that these few tips and tricks that I have picked up thus far in my home cooking journey can be helpful to you. Especially if meal planning and food prep are some of your new years goals!

Happy eating!


FOOD | Nutella Cinnamon Rolls

I feel like any introduction I write to this post will be completely ignored in order for you to scroll down faster towards the recipe (and rightly so! Nutella is not to be ignored!). This has continued to be one of those simple + easy + constantly hitting it out of the park recipes that I turn to time and time again. I make these cinnamon rolls for brunches, play dates, and last week I made them for a staff breakfast at school. Everyone always loves them and I never have leftovers after making these scrumptious little bites (which can be viewed as both a good thing and a bad thing). I honestly feel a little bad that I haven’t thrown this recipe up on the blog sooner because it’s just that good. I promise that you will not be disappointed and those you make these sweet treats for will leave with satisfied, chocolate-filled tummies. So I won’t continue to bore you while I wax poetic about my love of buttery bread and melted, gooey, hazelnut chocolate and we can just get on with the show.

IMG_3851

Nutella Cinnamon Rolls

Ingredients: 

  • 2  cans of refrigerated crescent roll dough (I use Pillsbury Original)
  • roughly 1/2 c. of Nutella (reserve about 2 tbsp for drizzling)
  • 1 tsp cinnamon
  • 1/2 tsp all spice
  • powdered sugar to garnish

Instructions: 

  1. Preheat your oven to 375 degrees (following the oven temperature on the cans of dough).
  2. In the microwave soften Nutella until it is almost runny – I usually pop it in for 10-15 second intervals until I get the consistency I desire.
  3. Spread out crescent roll dough on a lightly floured surface and press together seams of crescent roll triangles to make one connected piece of dough (I know Pillsbury made an un-seamed crescent roll dough for a while but I haven’t seen it in a while – this would be perfect for that!)
  4. Using the back of spoon spread out Nutella on crescent roll dough to make a thin layer. I’m always tempted to over do it and really lay that Nutella on thick but this is a case where less is more and makes it easier to roll up later on.
  5. Dust cinnamon and all spice over Nutella evenly.
  6. Roll up crescent roll dough length wise and cut into 1/2 inch pieces. I can usually get about 12 little cinnamon rolls per long roll of crescent dough.
  7. Space cinnamon rolls 1/2 inch apart on a lined baking sheet (either using a Silpat or parchment paper) and bake for 10 minutes at 375 degrees.
  8. Take out, let cool a bit, drizzle with remaining nutella and dust with cinnamon.

I have also made a vanilla glaze using confectioner’s/powdered sugar + milk + vanilla and drizzled that over the top of these rolls… I find that it makes it a little too sweet for my liking but it was still pretty good! I mean, you really can’t go wrong with carbs + chocolate in breakfast form, right?!

IMG_3854

Happy eating!

FOOD | Slow Cooker Quinoa Enchilada Casserole

One of my goals in this new year is to use our slow cooker more on Sundays. We have always had a pretty hectic evening routine on this particular day of the week because my husband and I both participate as band members for the youth mass at our parish. While this has been a part of our Sunday norm for almost nine years now we haven’t ever really had a regular Sunday night supper tradition.

In college, when it was just me singing at mass and going to the weekly Newman Catholic Ministry meetings on campus – pizza satiated my appetite on a regular basis. Then as a young working and engaged couple my husband and I both volunteered as Core members with our parish LifeTeen ministry so we always ate what the teens ate after mass. Then we got married and continued volunteering and it wasn’t until having a child of our own, and giving up other commitments after mass that I realized that we hadn’t established a Sunday meal ritual as a family. I also didn’t realize how important that was to me as a mother. I don’t want to give up our time singing and worshiping on Sunday evenings but I also want to provide a warm, delicious meal for my family to gather around as we begin a new week together.

Now here’s the kicker…after rehearsing songs, attending mass, cleaning up sound equipment, chatting with friends, etc. by the time we make it home it’s really hard to get the meal of my dreams on the table without someone getting hangry in our family (usually it’s a toss up between me and the toddler)…so in comes the wonderful, magical, fantastic invention that is the slow cooker. It’s a kitchen tool I use so often, yet I feel like I’m seeing it in a new light ever since mentally committing to making an effort toward Sunday night dinners. Seriously, it’s such a beautiful thing to be able to toss some ingredients together earlier in the day, give it a little stir, and then that evening be the domestic goddess I have always dreamed of being by serving my family a yummy meal. If I wore an apron and matching oven mitts while plating everyone’s food then I would really be achieving some major goals.

A few weeks ago we tried this fun little enchilada casserole/bake in the crockpot. I was inspired by this recipe that I initially found while browsing the wonderful world that is Pinterest. I really liked the idea of mixing it up a bit by using quinoa instead of rice when cooking a Mexican dish. I honestly was a little nervous to see how it would turn out or be received by the rest of my family but I can now say that the quinoa cooked perfectly and the recipe was an all around winner with both my husband and my toddler! We also had leftovers for dayssss so plan accordingly.

IMG_7150

Slow Cooker Quinoa Enchilada Casserole
Adapted from Bobbi’s Kozy Kitchen – Slow Cooker Chicken Enchilada Quinoa

Ingredients: 

  • 1 pound lean ground beef
  • 1 1/2 cups uncooked quinoa, rinsed (I used Trader Joe’s Organic White Quinoa)
  • 1 15 oz. can of fire roasted tomatoes
  • 1 cup frozen corn (I used Trader Joe’s Roasted Frozen corn and it added some really good flavor!)
  • 1 15 oz. can of black beans – drained and rinsed
  • 2 chopped garlic cloves
  • 1 chopped medium yellow onion
  • 1 chopped green bell pepper
  • 1 cup water
  • 1 16 oz. jar of mild salsa (if it were up to me I would have amped up the spice a bit – but tried to keep this as toddler friendly as possible)
  • 2 tbsp chili powder
  • 1 tbsp cumin
  • 1 1/2 cups Mexican Cheese blend divided (1 cup will be mixed in and leaving 1/2 cup for topping later)
  • 1/4 cup chopped cilantro for garnish (optional – we opted out this time around and instead used up some halved cherry tomatoes!)

Instructions

  • Brown ground beef in a skillet until completely cooked through. Add ground beef and remaining fat in skillet to slow cooker.
  • Add the following ingredients to the slow cooker: quinoa, fire roasted tomatoes, frozen corn, black beans, garlic, yellow onion, green bell pepper, water, and salsa. Stir until completely combined.
  • Add spices: chili powder, cumin, salt and pepper to taste – mix once again until well combined.
  • Add 1 cup of Mexican Cheese blend and mix until completely combined.
  • Put lid on slow cooker and cook on low for 3 hours until liquid is absorbed.
  • Then stir casserole one more time to ensure there’s no liquid on the bottom of the slow cooker and to fluff the quinoa. Top with remaining cheese and put lid back on slow cooker for about 10 minutes or until ready to serve.
  • Plate by topping with cilantro for garnish.
  • This casserole can be eaten by itself or served with tortilla chips for dipping. It’s also really great the next day spread over a flour tortilla and cooked as a quesadilla!

Happy eating!

IMG_7151

FOOD | cheese plate scramble

My husband and I have always loved entertaining people. Our first year of marriage we threw a few pretty excellent parties that resulted in some spectacular memories. We may have also been pretty close to going over the maximum occupancy in our apartment a time or two due to our abundance of guests…but who’s counting. While we love planning and executing bigger holiday shindigs we have also really come to love cooking for other people and throwing smaller dinner parties. The evenings we have friends or family over for dinner are my absolute favorite, because the day usually revolves around food. We wake up, make a pot of coffee, and start discussing menu options and recipes we want to try. Then we will usually make some sort of excuse to venture out into the land of the fancier grocery stores like Whole Foods or Central Market and wander around perusing all of the fun foodie finds the store has to offer as we pick up ingredients for that night.

Hosting a dinner party is always been a great excuse to pick up an assortment of cheeses, olives, prosciutto and a crusty loaf of french bread to snack on with our guests while dinner finishes up. I seriously love a good cheese plate and honestly this would be my dinner about 90% of the time if I were a single lady living on my own. We usually dive into the under $3 cheese bin and pick out a few small wedges so that we can try a good assortment and then hop on over to the olive bar and fill up a tub of salty goodness (which usually ends up being eaten by me but I’m not complaining). Then we venture over to pick up a package of prosciutto or salami. Well about a month ago we discovered that our local Whole Foods meat counter slices the larges pieces of prosciutto I have ever laid eyes on. I was pretty much salivating on the glass case as the man behind the counter handed me my package and sent me on my merry meat loving way.

The morning after hosting our little dinner get together we had tons of salty prosciutto and smoked Gouda left over. I decided to roll up the prosciutto and chop it up into ribbons, grate the rest of the smoked Gouda and scramble it all up with 4 eggs. Then I buttered a couple pieces of french bread we had left over and toasted them up on the stove as well. Needless to say it was the best + easiest breakfast invention of my life and now I have even more reason to host dinner parties;  now I know that breakfast the next day is assured to be as good as the dinner the night before.

IMG_1661

Cheese Plate Scramble

Ingredients:

  • 2-4 eggs (2 eggs per person being served)
  • 2-3 large thin slices of prosciutto rolled and sliced into long ribbons
  • approx 1/2 cup smoked Gouda (I have also used Parmesan and a sharp cheddar, so really whatever cheese you have)
  • salt + pepper + dried rosemary
  • 1 tbsp of extra virgin olive oil
  • a couple of slices of french bread buttered and toasted

Instructions: 

  • Heat olive oil in a large skillet on the stove at medium-high. Crack and whisk your eggs together in a separate bowl (I used to think the whole separate bowl thing was a joke until I realized I ALWAYS get egg shells in my eggs…) and then put into skillet moving around with a spatula as they cook.
  • When eggs are about half way cooked add in prosciutto, cheese, and seasonings.
  • Scramble up until fully cooked.
  • Divvy up into bowls.
  • Use your already preheated skillet to toast your bread on both sides (I liked to sprinkle a little dried rosemary while I’m toasting my bread)
  • Eat + enjoy!

IMG_1658

Seriously one of the most solid + delicious breakfasts that never lets me down.

Happy eating!

FOOD | pie bites + everything dip

Pie.

Warm, sugary, delicious, pie.

When I think of pie my mind immediately conjures images of buttery, flaky crusts oozing with warm, syrupy fruit fillings. There is something so comforting and nostalgic about a freshly baked pie being pulled out of the oven. Pie is a dessert that will always have a place in my heart and my stomach for that matter. But that being said, pie isn’t all delicious bites and savory moments.  I am completely aware of the severity of this topic I am writing about today. It is an age old debate:  crust vs. filling – which of these two key pie-making components is really the best part of your dessert experience? On one hand you have countless filling options: pecan, cherry, strawberry, rhubarb, blueberry, etc, etc. (don’t even get me started on savory pies…I’m looking at you sweet potato). With so many options there could literally be a filling type to satisfy any craving. Then you have your crust. There is consistency with the crust. It is a part of any pie and you know that no matter what variation of filling you may be delighting in at the moment of your sweet treat consumption… you can always finish off your experience by taking those last bites of crust. Is it obvious? I am hands down, by all means a crust person when it comes to a solid piece of pie.

A few summers back I was trying to think of a sweet something to take to a 4th of July party at a friend’s house. I thought about making a pie, I had all the ingredients to make a patriotic filling of strawberries and blue berries- but was short on time. Necessity being the mother of invention; I had to get creative. I thought about making mini pies in muffin tins, folded over hand pies, or personal homemade pop tarts but I didn’t think I had enough pie crust to make a good amount to share. So then I thought, why not make something even tinier? Mini desserts are by far one of my favorite things. So tiny, so cute, so easy to justify eating a handful (or three). In comes the idea for Pie Bites – a tiny little mini poptart/hand pie (I suppose you could call it a finger pie) made of far more crust than filling to satiate the taste buds of crust lovers everywhere.

Now I know what you’re thinking… I forgot another integral part of the pie eating experience: whipped cream. I mean who on God’s great earth can have a slice of pie without a little whipped cream? The two go together like Paula Deen and a stick of butter. I wanted to make a dip to frost these little babies in but didn’t want to resort to a tub of Cool Whip or a can of whipped cream. I also wanted something a little bit heftier with more flavor. And so here is the best dip/whipped topping that I have ever made. No joke. I use this dip for EVERYTHING. So when thinking of a title for said dip I thought…why not the Everything Dip? From Pie Bites to cut up fruit – it’s delicious on just about every sweet treat we eat.

Pie Bites

Ingredients: 

  • 2 boxes of refrigerated pie crusts (I am a big fan of Pillsbury – they don’t fall apart as easily when rolling out)
  • flour
  • cinnamon sugar
  • butter

For Pie Filling:

  • Any fruit of your choosing (I have used strawberries, blueberries, peaches, etc.) diced into tiny pieces
  • 1/4 cup of granulated sugar
  • 1 tsp of cornstarch

Instructions: 

  • Preheat oven to 450 degrees
  • Dice fruit (with the exception of blueberries – they are tiny enough to fit into the bite all on their own) and mix with sugar and cornstarch. Set off to the side while you roll out your crusts. This lets the filling thicken up a bit and become more like pie filling.
  • Take your pie crusts out of the box and roll out with your rolling pin to make them a little bit thinner. Then fold over the edges making it a square.

IMG_1604

  • Fold over into fourths and roll out again – now you’ll have a large rectangle of dough to work with.

IMG_1605

  • Using a pizza cutter or pastry cutter cut your dough into columns and rows (the width and height of your little bites is completely up to you – beauty of a simple recipe!)

IMG_1599

  • Spoon a few pieces of your pie filling onto your dough – skipping ever other column.

IMG_1602

  • Now layer the piece of dough next to the pie filled dough on top. Press down edges with a fork.
  • Brush the tops of your bites with melted butter and sprinkle with cinnamon sugar on top.
  • Bake in the oven for about 8 minutes or until tops of the pie bites are nice and golden brown.

piebites


Now who can have a slice of pie without a little whipped cream? The two go together like Paula Deen and a stick of butter. I wanted to make a dip to frost these little babies in but didn’t want to resort to a tub of Cool Whip or a can of whipped cream. I also wanted something a little bit heftier with more flavor. In comes the best dip/whipped topping that I have ever made. No joke. I use this dip for EVERYTHING. So when thinking of a title for said dip I thought…why not the everything dip? From Pie Bites to cut up fruit – it’s delicious on just about every sweet treat we eat.

Everything Dip

Ingredients: 

IMG_1623

  • one pint of heavy whipping cream
  • 1 tbsp of vanilla extract
  • 1-2 tsp ground cinnamon
  • 1/4 cup granulated sugar (easily replaced by splenda if you are trying to watch that sort of thing)
  • 1 tsp ground nutmeg
  • 1 single serving container of plain greek yogurt (I like to use the 2% FAGE Greek Yogurt – I’ve also used their whole version, just don’t use anything with less than 2% because it can get runny)

Instructions: 

  • With a stand mixer or hand mixer whip your heavy whipping cream until you form stiff peaks (have no idea what “stiff peaks” are? It’s ok, I didn’t for the longest time – until I read this)
  • Then add your sugar, vanilla, cinnamon, and nutmeg – continue whip until all ingredients are combined.

IMG_1627

  • Fold in your greek yogurt (or you can continue to use your mixer just beat on LOW – make sure to not over beat/mix your dip because it will get all funky/runny)
  • Chill and serve with your delectable pie bites. I assure you this dip is the best thing to have in your brunch hosting, dessert serving, dinner party throwing tool belt.

Happy eating!

FOOD | one fish, two fish

Last week I went to our local Sprouts for our weekly grocery round-up. Mainly for the awesome deal they were having on salmon! I mean I really couldn’t pass up the chance to make a few more delicious seafood inspired summer suppers. Salmon is a summer go-to for us because it’s so fresh and easy in the unbearable Texas heat. It’s easily grillable, a great a addition to any salad and super flavorful. Salmon was also my intro to cooking seafood. I was always a little intimidated by fish but salmon proved to be pretty low stress and yet still full of flavor. Now, because I have a baby and efficiency is pretty much my goal at any point in the day I was able to make two dinners (and a few lunches!) in one night. If I only I had been wearing my matching apron, oven mitts pearls… I would have hit serious domestic goddess status.

Night one was a no leftover type dinner. It fed my husband and myself well for that night and then I took the extra salmon and mixed it into the salmon. I always appreciate when bloggers/recipes give me realistic measurements and ingredients needed – so for two adults with pretty healthy appetites I bought 1.5 pounds of salmon. I would say we probably ate a half a pound between the two of us for night one and then I used the remaining pound for my orzo salad. Just FYI.

Recipe #1: Coconut oil pan fried salmon + lemon parm bacon broccoli IMG_1438

Coconut Oil Pan Fried Salmon: 

  • Coat the bottom of pan with coconut oil and heat up over medium-low heat
  • Season salmon to your liking (I did a little s+p+lemon pepper)

IMG_1455

  • Put that beautiful slab of pink deliciousness in your pan and watch that magic happen
  • Cook until golden brown on one side (approx. 4 minutes or so)
  • Flip with spatula to the skin side until it feels firm to the touch (I like to flake off a bit on the corner too, usually that means you’re good to go as well)


Lemon Parm Bacon Broccoli (cheese + bacon = you know this veggie is gonna be good)

Cute side note: So this is actually a recipe acquired from my husband which I’m pretty sure he acquired from his grandma.

IMG_1460

  • I use fresh broccoli so I cut apart the crown into florets (I used two small-medium sized crowns)
  • Drizzle with coconut oil (or olive oil – I was sticking with the theme) and lemon juice
  • Sprinkle with s+p, crumbled bacon bits, and freshly grated parmesan
  • Stick in the oven for about 10ish minutes at 350* (I check after ten – you want the broccoli to soften a little and the parm to be completely melted)

IMG_1481


Recipe #2: Salmon Orzo Salad over Kale

With you remaining pan fried salmon you are going to make the most delicious orzo salad that you will eat for dinner (and lunches for days!) the NEXT day. So much flavor the next day.)

Ingredients: 

  • Leftover salmon
  • Orzo pasta
  • Red & green bell peppers
  • Red Onion
  • Green Onion
  • Artichoke hearts (I used some we had that were in water – I’m sure marinated would be great too but I probably wouldn’t use so much dressing)
  • Crumbled Goat Cheese or Feta
  • Rosemary Balsamic Vinaigrette (I used Sprouts brand – you could totally do Italian too)
  • Kale
  • Salt, Pepper, Dried Oregano


Instructions: 

  • Flake apart salmon with a fork into little pieces
  • Cook orzo pasta according to package (I used Barilla which has about 2 cups and makes a TON – you could totally half that and you would probably have enough salad for 1 dinner and a couple lunches)
  • Chop up your bell peppers, onions, artichoke hearts

IMG_1474

  • Combine salmon bits + bell peppers + onions + artichoke hearts +orzo and mix together
  • Season to your liking with s+p and dried oregano
  • Coat with Rosemary Balsamic Vinaigrette (I used about half the bottle)
  • Fold in goat cheese crumbles
  • Chill overnight and enjoy eating over a bed of fresh kale (optional)!

IMG_1489


Happy eating!

new week, new recipe: mediterranean fried rice

A few Saturdays ago we were having a quiet night in and I was really craving some Chinese takeout. Namely that delicious fried rice that every little hole in the wall Chinese restaurant does oh so perfectly. Fried and tossed to perfection but not the most nutritious in terms of healthy eating. The three ingredients I knew we had on hand at the time were rice, eggs, and oil. In an effort to use up some produce I added zucchini, chickpeas, and red peppers… not your usual mix-ins but I thought I would give it a try and to my surprise it actually turned out pretty darn delicious! medfriedrice Ingredients: 

-2 cups brown rice

– cooked according to package (I usually have Minute Brown Rice on hand)

-2 eggs

-1 red bell pepper chopped

-1 medium zucchini chopped

-1 small red onion chopped

-1 can of chickpeas

-olive oil (next time I’ll probably try coconut oil)

-dash of sesame seed oil


1. Cook rice according to directions on the box – like I said, I usually have Minute Brown Rice/Uncle Ben’s because it’s the easiest and our rice cooker intimidates me.

2. Lightly coat bottom of skillet with oil and toss cooked rice for 1-2 minutes

3. Add in chopped zucchini, onion, red bell pepper and toss until cooked through (I personally don’t like completely cooked bell peppers and prefer a little crunch so I add them in last to ensure  the least possible amount of mushiness).

4. Crack two eggs into rice and break apart while continuing to toss mixture in the pan.

5. Add your sesame seed oil in last – this really rounded out all of the flavors and added a little extra something to a pretty simple dish.

5. Once your eggs are completely broken apart and cooked through – you’re done! Enjoy!


Happy eating!

new week, new recipe: southwest loaded sweet potatoes

I think I should start this post by being completely honest and admitting that I have never been one of those people who has been able to come up with a recipe off the cuff.

My creativity in the kitchen has always been limited to altering seasoning amounts or adding more chocolate chips than necessary when baking. I am always so jealous of those creative minds who so effortlessly create these amazing, healthy, delicious meals…without a book or Pinterest or family recipe to fall back on. Seriously people, how do you do it? I feel like I could pull the teacher excuse and safely say that by the end of the day all of my creative juices have been put towards making math lessons more exciting and breaking up tattle-tale fights…

Well, I’m not sure what happened but while grocery shopping this weekend I had a sudden burst of foodspiration in the target canned food aisle and came up with the following recipe all. on. my. own. Applause? High Fives? Please?

Anyways, I will say that I was somewhat inspired by Lauren’s Instagram and her super adorable blog that I just recently started following. I am always drooling when I scroll through her IG and am always wondering how she can make a sweet potato look so delicious in so many different ways!

So behold my Southwest Loaded Sweet Potatoes (while they may not technically considered “clean” I thought we got pretty darn close!)

Ingredients:

-1.5-2 Chicken breasts (I used about a pound and a half)

-Two medium sweet potatoes (I actually went ahead and made three so we would have leftovers)

-Plain greek yogurt (I used two single servings of 2% Fage)

-1 can of black beans – drained and rinsed

-1 can of whole kernel corn -drained and rinsed

-half of a yellow onion – diced

-1 green bell pepper – diced

-1 packet Hidden Valley Ranch Dip seasoning

-Sharp Cheddar Cheese

-Cilantro (unless you are one of those unfortunate people who thinks cilantro tastes like soap and for that I am very sorry…use parsley)

-A few glugs of olive oil

-Salt/Pepper

1. Ok, so start by chopping up your chicken breasts into chunks. Season with salt and pepper and saute over the stove in olive oil. Like so:

Image

2. While you are cooking your chicken bake/soften up those sweet potatoes in the microwave. I poke a few holes in my taters, put them in the microwave for about 3 minutes, flip over and then finish them off for three minutes. Then they are perfectly cooked and ready to go.

Image

3. After your chicken is done remove it from the pan, add a few more glugs of olive oil and pour in your canned corn, black beans, onion, and bell pepper. Cook until onions are translucent. (I had already made this beforehand for another recipe).

4. In a small bowl combine your greek yogurt with your ranch seasoning to make your “sour cream.”

Image

5. Then load it on up! Slice open your potato, slather on your fake yet delicious “sour cream” concoction, spoon on your black bean/corn/onion/bell pepper mixture, some chicken, a little sprinkling of cheddar cheese, and a spring of cilantro (unless you lead a sad soapy tasting cilantro life – again, I’m so sorry for you!).

Image

Image

Happy eating!

new week, new recipe

Last night we tried out the Lazy Bolognese by the brilliant folks over at Dinner a Love Story. I really can’t rave about their blog or cookbook enough. They are slowly but surely becoming one of my default resources when I meal plan for the week because their recipes are SO easy and never.ever.ever.fail. They speak my recipe love language and make things so easy to understand. Trust me. You’ll fall in love too.

IMG_0231IMG_0233 IMG_0244 IMG_0249 IMG_0251

Variations I made:

-I used rotini pasta because it was on sale

-I also added some oil flavored olives to the sauce because they were begging to be used in something and to get off the shelf of our fridge (non olive lovers rejoice – the original recipe does NOT call for them:)

-I ditched the fennel seeds because… I honestly couldn’t find them at the store and I have never cooked with them before and the recipe still turned out delish #rebel